We have seen the gazillions of “how to start a blog” posts out there nowadays. But, what if you want to focus on something specific? What if you want to start a wedding blog? Where is the guidance for that??? We cannot stress the need for having a blog when you have a business enough – so if you are a new (or experienced) wedding planner, we highly suggest that you create a blog immediately!
In this super informative post, we will be looking at all of the different aspects of starting your very own wedding blog in 7 steps, and what it takes to become a wedding blogger.
Be sure to take notes, and bookmark or save this post somewhere, for future reference!
How to Start a Wedding Blog + Monetize it!
Nowadays, it is quite common to hear people say: What is a blog and how do I start one? Or even, how to start a blog for your business? Well, we have broken down the daunting task of how to start a new blog, into seven manageable steps:
THE STEPS
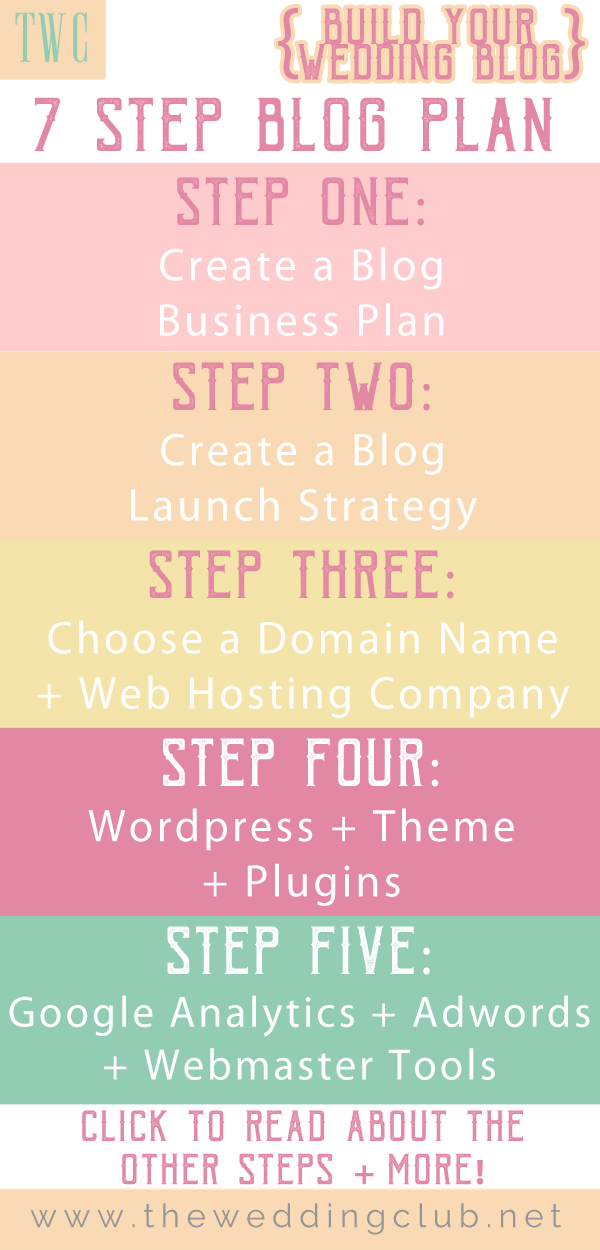
Step One: Create a Blog Business Plan (Read this post for everything you need to know about a blog business plan)
Step Two: Create a Blog Launch Strategy
Step Three: Decide on a domain name and web hosting
Step Four: WordPress + Theme + Plugins
Step Five: Google Analytics + Webmasters + AdSense
Step Six: Get your first post on there!
Step Seven: Plan, Create and Promote!
(We’ve made it easier for you to build your blog from the first step to the last, with our Blog Planner Kit. Plan, manage and maintain your blog with all of our printable sheets and planners + all our freebies in one place. Click here to get our Blog Planner Kit now. The Black Edition can be found here.)
NOTE: Step One can be found here!
Step Two:
Create a Blog Launch Strategy
There is nothing wrong with planning ahead! If you haven’t created and launched your blog yet, you should have a blog launch strategy in place. And it’s never too late to have a strategy in place if you already have a blog!
The benefits of a blog launch strategy are:
- You already have an idea of what you are doing/working towards
- Reaching your goals will be easier and faster
- Your blog is already organized right from the beginning
You can plan and create ahead, because you already have a clear strategy in place – this will make your blogging plan so much easier. You can already create a list of topics, freebies, content and more!
The Basics
When are you planning to launch?
Will it be a set date such as 15 June, or vague such as “in the next 3 months”? Having a launch date will help you to work out what needs to be done beforehand and when it should be done.
How many blog posts do you want to write before officially launching?
It is a great method to pre-write your blog posts in a text editing program such as MS Word, before copying it into WordPress and publishing it. The great thing about WordPress is that you can schedule your blog posts ahead of time using the post editing screen.
Tip: If you want to create a few blog posts before officially launching and promoting your blog, we recommend no more than 10 is sufficient.
Which blog posts are you going to write before the official launch date?
Having a list of blog post titles on hand can be useful. It will help you to keep on writing and publishing posts, because you already have ideas for them.
To pre-promote or not…
A lot of bloggers decide to announce their new blog before launching it. They focus on gaining social media followers and e-mail subscribers. They will then announce their blog through those channels.
Creating valuable, high quality content
Make sure your blog posts are of high quality and informative. Getting your blog posts right from the start of your blog can be rewarding. You will probably rank faster on Google and gain a strong following of devoted readers from the early stages of your launched blog.
Have your goals and business plan in place!
Set up your blog business plan and blogging goals from the start. This way, you already know which direction to go and which blogging goals you want to achieve.
What to do if you already have a Wedding blog
- Fixer-upper your blog, today! – Polish your past blog posts and improve your blog where you can.
- Still have a blog business plan in place – You can still create your blog business plan, even after you already have an established blog.
- Reflect, review and improve – Reflect on what worked in the past (for example: what brough in more traffic or money) and create more of those! Get rid of clutter on your blog and improve in your blogging skills such as writing techniques and keyword forming.
- Like we mentioned: CONTENT! – Create more content and then keep on creating! Content is what brings in the masses!
A good blog post goes a long way… Really focus on blog posts that you know people want to read. Do your research and find keywords to include. Have informative posts and create long blog posts of a few thousand words each.
(We’ve made it easier for you to build your blog from the first step to the last, with our Blog Planner Kit. Plan, manage and maintain your blog with all of our printable sheets and planners + all our freebies in one place. Click here to get our Blog Planner Kit now. The Black Edition can be found here.)
Also Read:
- How to become a wedding planner from home
- How to promote your wedding planning services on social media
- 16 Questions to ask yourself before you become a wedding planner
Step Three:
Your Domain Name and Web Hosting Service
How important is your blog’s domain name really?
It is quite important, actually. Some people will tell you it is and some will say the opposite. But your domain name is the “first name” of your blog. And what do you do meet someone new? You introduce yourself with your first name! In the same sense, you obviously want to introduce your wedding blog to your audience, so make sure you have a good name!
Ask yourself this: Would you rather go to ‘kjagfoyuukrh25.com’ than ‘theknot.com’? No! The first one looks all spammy and unprofessional.
Take your time to come up with at least 5, well thought out, domain names.
How to decide on a domain name…
If you are struggling to come up with any domain names, think of what is synonymous to ‘wedding’. Words like dress, veil, venue, bride, groom, ring, I do, etc. comes to mind.
Think of how you can “decorate” one of those keywords with adverbs, adjectives or verbs to make it more meaningful and unique.
Tip: You will more likely rank higher if your domain name includes a keyword that is frequently searched on Google. For example, people who search for ‘wedding’ will more likely discover one of our blog posts or our website, because our domain name includes the word ‘wedding’.
How to check if your domain name is available
You can check if your domain name is available by going to NameCheap.com. They have a search box where you can simply type in the domain name you wish to acquire and they will check the availability for you.
Also, if you choose a web hosting service such as Siteground or Bluehost, they automatically check if the desired domain name is available once you sign up with them. It is easier to work with a hosting company instead of trying to set your website up through a private server. The hosting company will guide you through the steps and usually provide much needed support when you need it.
What is a web hosting service?
A web hosting service or company hosts your website for you. To put it in a simple way: Imagine your website is a house and the hosting service is the yard or plot that the house is built upon.
A web hosting company makes use of servers, on which data is stored from multiple websites – including your wedding blog’s website. That is why it is so important to make sure you choose the right one.
Where can I find a good, reliable web hosting service?
A web hosting service should, no doubt, be reliable (a lot of down time can damage your website and make your traffic numbers go down). You also want a web hosting service that provides the best support when you need it – 24/7!
We highly recommend that you check out Bluehost and Siteground.
(We’ve made it easier for you to build your blog from the first step to the last, with our Blog Planner Kit. Plan, manage and maintain your blog with all of our printable sheets and planners + all our freebies in one place. Click here to get our Blog Planner Kit now. The Black Edition can be found here.)
Step Four:
Install WordPress and choose a theme for your wedding blog + install plugins
Installing WordPress…
After you have chosen your hosting company and paid your membership, you need to install WordPress.
Your hosting company will have easy steps to follow to achieve this.
The WordPress Admin Dashboard basics
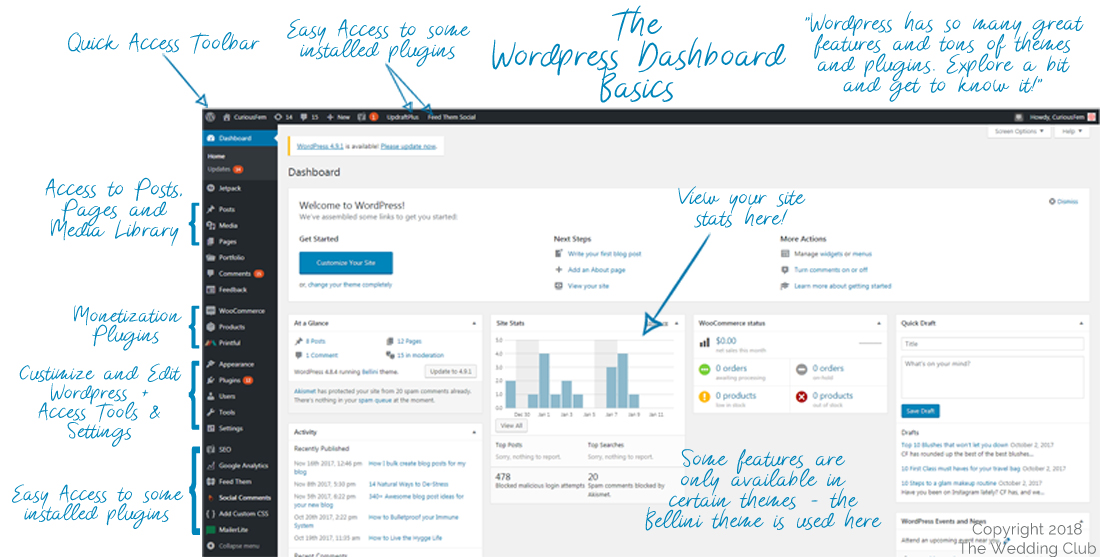
WordPress might look scary at first, when you access the admin dashboard – but it is very easy to get used to. Knowing the basics of where to access what can be mastered quickly. It looks complicated when you are in the admin dashboard, because WordPress has so many great features. You can really create a virtual masterpiece with it!
The Dashboard overview
Where to find what
Tabs and buttons are simply named, so that you can easily find what you are looking for. If you are looking for all of your posts that you have published, for example, you will click on the “Posts” tab.
Creating and Publishing content
If you want to create a new blog post, page, etc., use the “+ New” button.
The Media Library
You can access your media library by clicking on the “Media Library” button. Here you can upload all sorts of media (images, video, files) in different formats. The maximum upload size is 2 MB.
Tip: If you want to upload a video, we recommend you make it smaller by using Handbrake (free). If it is still larger than 2 MB, upload it to YouTube (create a YouTube channel), and simply copy the video code/link and paste it into your blog post. WordPress will automatically embed the video, without using up any WordPress space. Alternatively, you can add the video, by using the “Add Media” button at the top of the blog post. The Media Library will open. Click on the “Insert from URL” button on the left hand bar and copy the URL from YouTube.
Customization Options
You can customize your site by using the different options in the “Appearance” tab. To customize your site’s header, colors, etc., go to Appearance > Customize. You can also manually edit and customize your site’s look by using the Editor – you need to know CSS for this. (Learn CSS here.)
Tools and Settings
To change settings and features on WordPress, use these buttons. Never change something if you don’t know what it is.
Quick Access Toolbar
Most of the features that you will use will be available on the Quick Access Toolbar at the top. From here, you can add new posts and pages, access comments, preview your site, etc.
Admin settings and options
You can access the administrator settings on the top right corner of the dashboard. Change all of your info here. You can also set your WordPress Admin picture here – you will need a Gravatar account for this (free).
Adding another user
Adding another user is great if more than one person will write posts for your blog.
Customize view
Once you decide to customize your site (Appearance > Customize), can normally change the following. Note that installing different themes will enable different features to be customized.
Header – The header is the image at the top of your site.
Footer – The footer is located at the bottom of your site.
Sidebar – Depending on the theme, your sidebar will be either on the left or right hand side of your site. It usually contains your blog categories, a search bar, calendar and archives. You can easily add and remove these features (and more) in all themes.
Widgets
Widgets can be placed in the header, footer and sidebar sections of your site. It is normally add-ons such as comment boxes, images, calendars, countdown timers, archives, social media links and buttons, etc. There are hundreds of widgets available out there, and some will automatically be included with certain themes.
Choosing a theme for your wedding blog
When you first start out with your wedding blog, we recommend that you go with a free or demo theme first, before buying a premium theme. There are lots of free themes on WordPress, where upgrading to a premium version of those themes are optional. Once you have fallen in love with a certain theme, you can look into upgrading that theme to a premium version.
To explore themes in WordPress, go to your WordPress dashboard and click on Appearance > Themes.
We love the standard WordPress themes (2016, 2017 etc.), as well as the Sydney and Bellini themes. Before exploring the vast world of themes, try sticking with a standard WordPress theme such as 2016, until you get the hang of things.
What is a WordPress plugin?
To get the most out of your wedding blog by using WordPress, there are so many plugins available. A plugin is an additional “add on application” which you can install to access more features for your blog.
Some plugins run in the background to optimize your blog (increase speed, optimize images, etc.), others are accessible through the admin dashboard and help you to fully edit and customize your blog’s content (grid layout, editor plugins, etc.)
Here is a list of plugins we use to manage and run our site:
- Updraft Plus
- Yoast SEO
- Jetpack
- Akismet Anti-spam / WordFence
- Shareaholic
- Feed Them Social
- Heateor Social Comments
- SiteOrigin Widgets Bundle
- Grid Shortcodes
- Autoptimize
- WP Fastest Cache
- EWWW Image Optimizer
To install a plugin
There are two ways to install a WordPress plugin:
- From the admin dashboard, go to Plugins > Add New, and use the search box to find what you are looking for.
- Or, if you have downloaded a plugin (should be in .zip format), go to Plugins > Add New and then click on the “Upload Plugin” button.
(We’ve made it easier for you to build your blog from the first step to the last, with our Blog Planner Kit. Plan, manage and maintain your blog with all of our printable sheets and planners + all our freebies in one place. Click here to get our Blog Planner Kit now. The Black Edition can be found here.)
Also Read:
- Smart strategies to nail your first wedding client consultation + free printable
- 20 Reasons why wedding planning is the best job in the world, ever!
- 6 Easy ways to deal with difficult wedding clients
Step Five:
Google For The Win!
Google has many nifty tools for bloggers, and we highly recommend that you use them as soon as possible or right from the start! Though this step can be omitted for later, we suggest you at least get a Webmasters account (free).
Google AdWords – for research
The Google AdWords application is BIG. Normally, you would use AdWords on your blog to make money from Google. However, our reason for using this great platform is because of their Keyword Research Tool.
SEO (Search Engine Optimization) is playing a great role in your blog posts. Including high ranking and competitive keywords will help your blog posts to rank high in Google search results.
To determine which keywords to include in your blog posts, you can use the Google AdWords Keyword Tool for free.
Here is a short tutorial:
1. Access the Keyword Planner tool
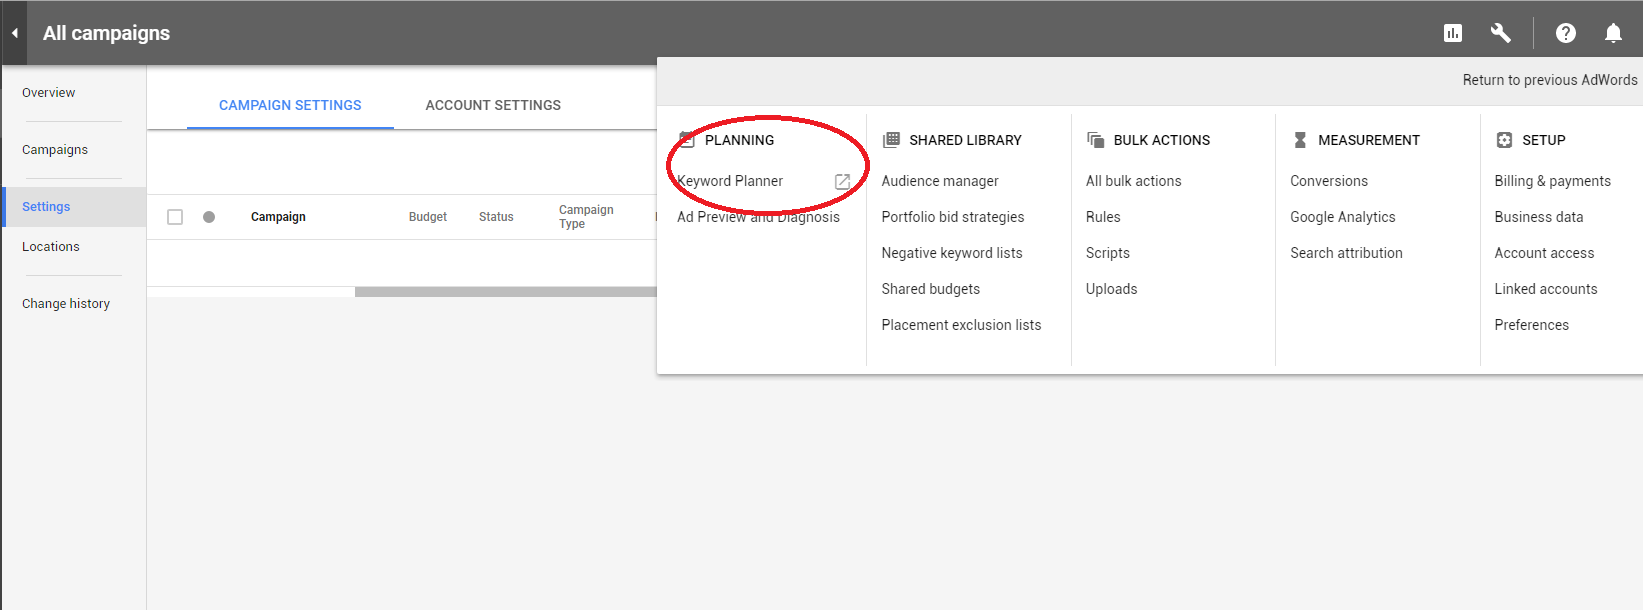
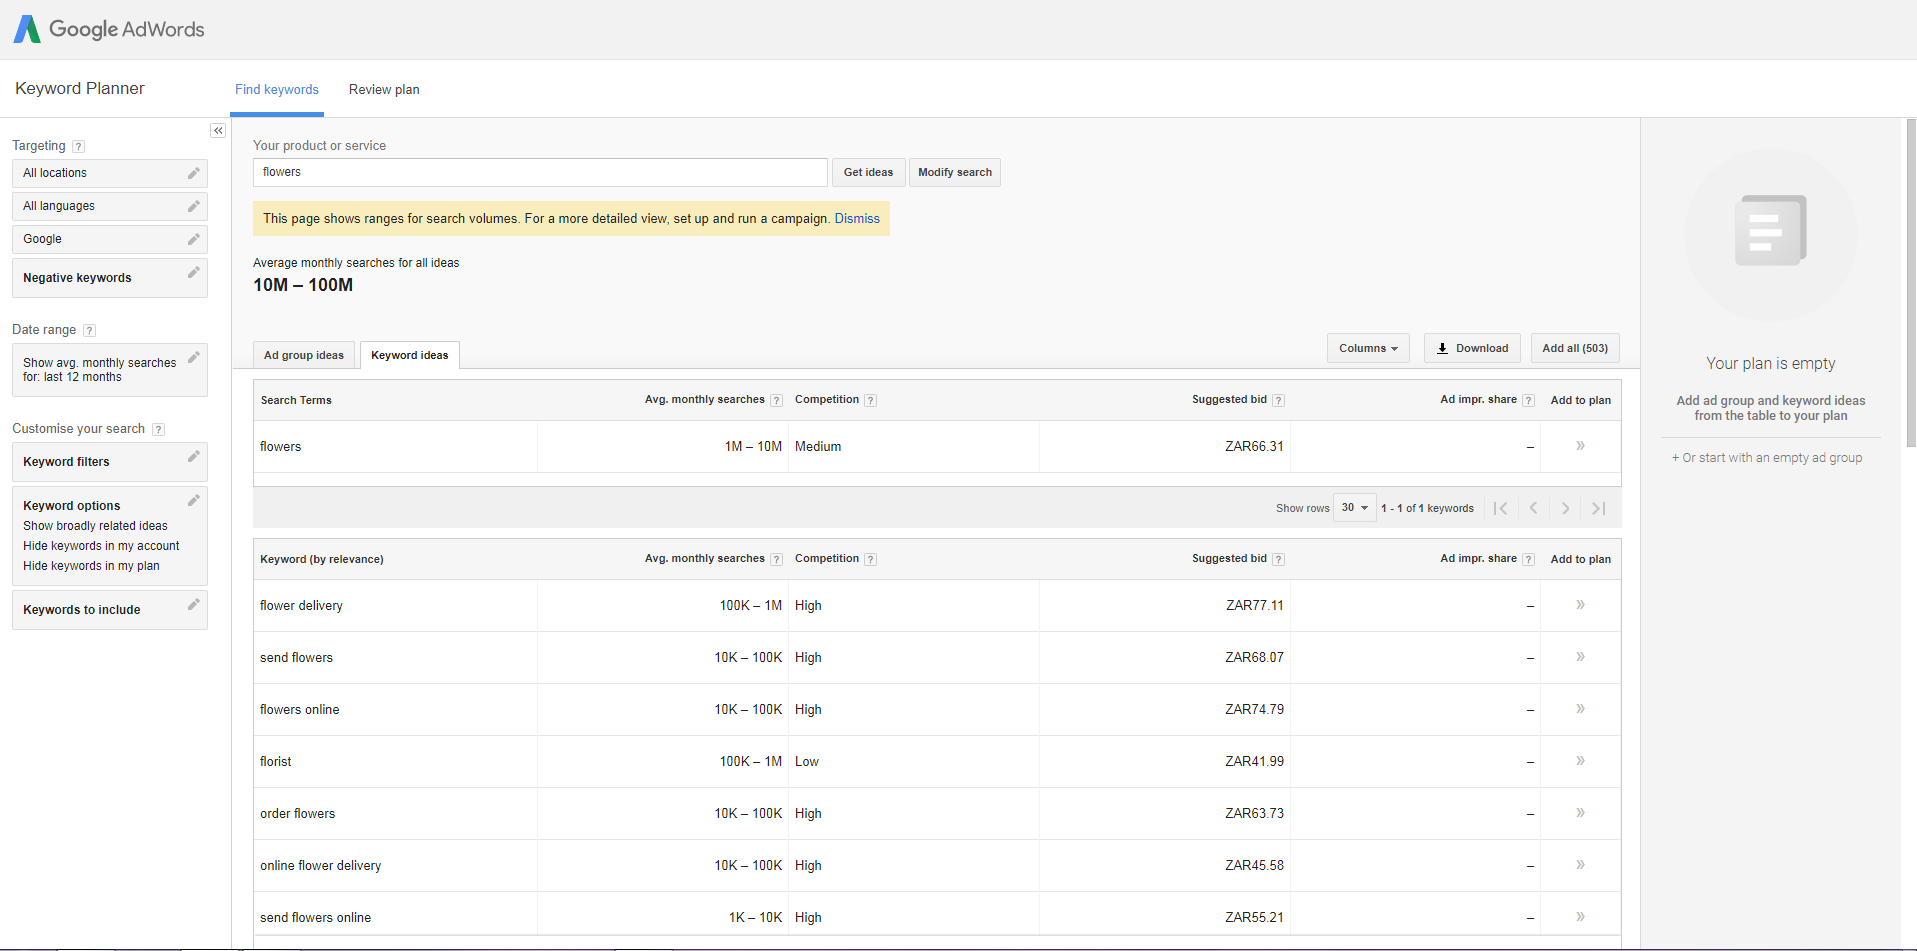
2. Search for a keyword or phrase
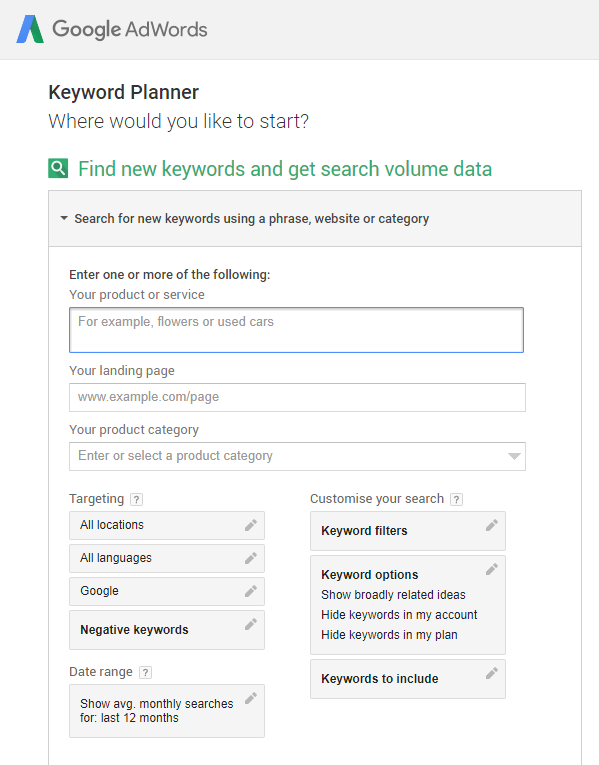
3. Filter your results and choose your keywords
Google Analytics – for tracking
Google Analytics analyzes your blog and captured data which you might find useful and interesting – not to mention highly motivational!
Using an analytics tool is so important for your blog, because that is how you will track your progress and determine if you have reached any blogging goals.
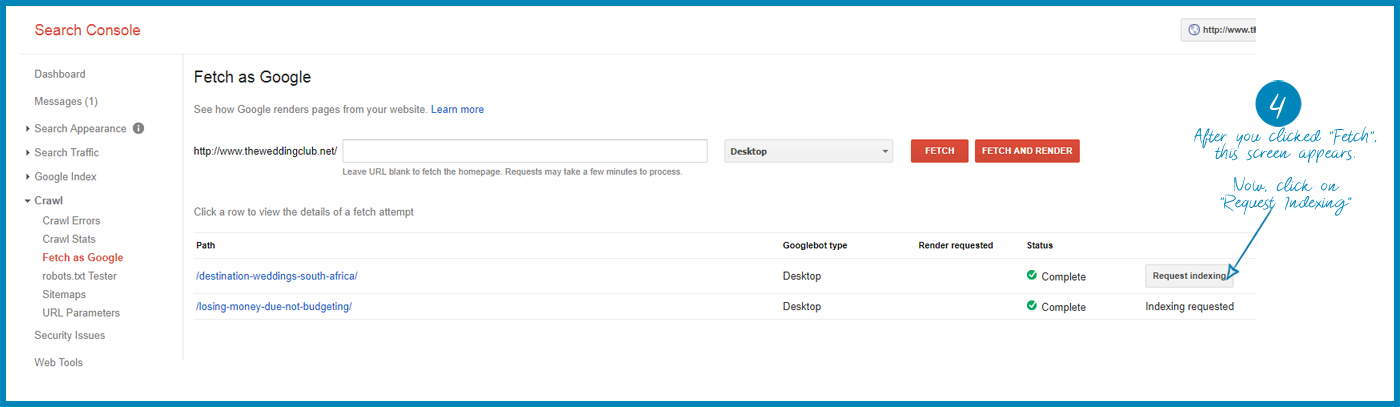
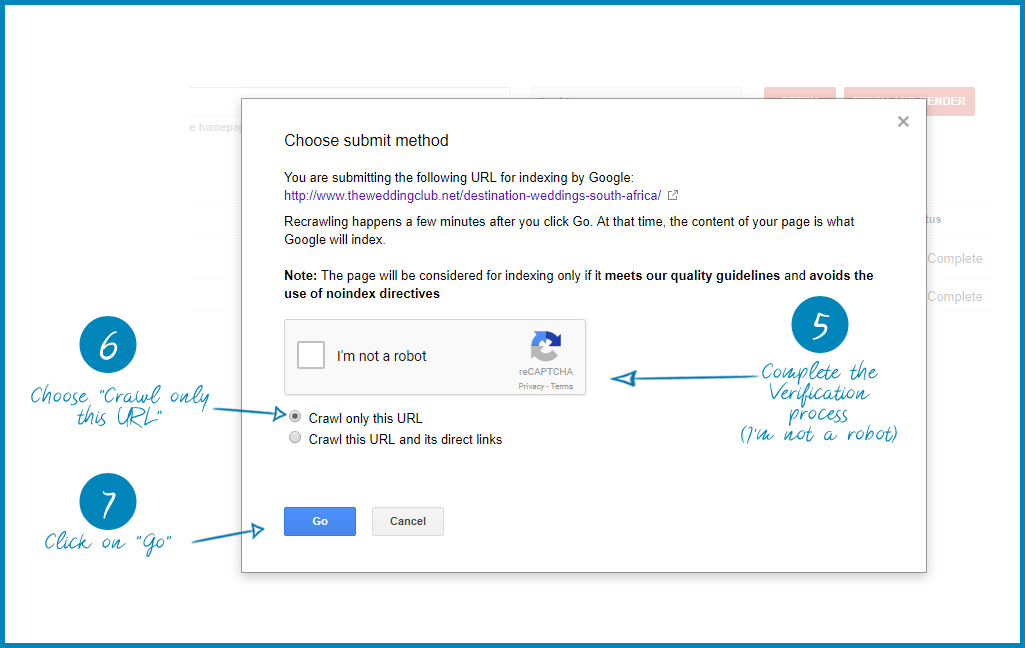
Google Webmasters – for getting yourself out there + even more tracking details
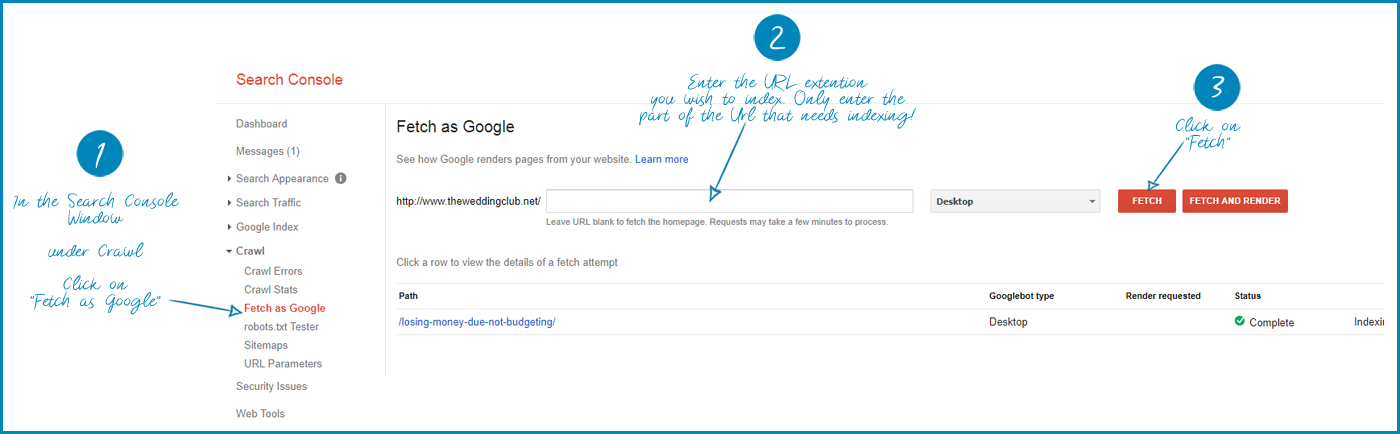
Once you have published your latest blog post, Google will take a bit of time before your post is ranked and “searchable” in Google search. We call this indexing. Once your blog posts and pages are indexed, your content can be found by organic traffic – people will search Google for something wedding related, and, depending on the keywords you used in your blog, they will find you.
Google Webmasters will speed up the indexing process. It also helps to find errors on your blog and more important information which you can use to improve on your blog.
Here is a quick tutorial for indexing new blog posts/pages in Webmasters:
Don’t forget: Jetpack + WordPress Analytics!
You don’t need access to every single analytics tools out there, but having a few of them will help you to get as much info from your blog as possible.
WordPress comes with its own analytics tool. We also recommend that you install the Jetpack plugin.
Finally, it’s all about speed
Studies have shown that the average visitor to a blog will wait approximately 3 seconds for the page to load. If your blog’s pages and posts take too long to load, you can lose valuable traffic. In the age of technology, people have become impatient. They will likely close the page and go somewhere else if it takes too long to load.
We recommend that you calculate your website’s loading time by using Google PageSpeed Insights
(We’ve made it easier for you to build your blog from the first step to the last, with our Blog Planner Kit. Plan, manage and maintain your blog with all of our printable sheets and planners + all our freebies in one place. Click here to get our Blog Planner Kit now. The Black Edition can be found here.)
Step Six:
Publishing your first post (well, finally!)
Now we are getting to the good part of starting a wedding blog: how to write and publish your first blog post.
We first want you to get the look and feel of creating your first blog post, so go ahead and do that now… It doesn’t have to be The Best Blog Post in the World. In stead, make it a short post, play around with the editor a bit, insert an image or two, and hit PUBLISH! (You can delete this post, or improve it – just publish it!)
The reason for this first blog post, is so that you can get started. A lot of people create a blog, choose a theme and brand, and… just stop there. There are so many abandoned blogs out there, it’s
crazy!
The truth is: If you don’t start now, when will you? Don’t worry too much about perfection right now – launch now, perfect later!
Bulk creating + scheduling
Your ultimate goal right now is to get as much high quality content out there as possible – and fast! Blogging is such a competitive business, that you need to be ahead of the game at all times.
We highly recommend that you bulk create as much content as possible for your blog, and then schedule it.
Share + Engage
Don’t just sit there and wait for your blog post to magically go viral… It will take very long for Google to start ranking you for your posts. In the meantime, rather share your content immediately with the world!
Use social media platforms like Facebook, Twitter, Instagram and Pinterest to your advantage.
To share on Facebook, create a post on your personal profile and share it with friends, or even better: Create your own Facebook Page! You can also share and engage with like minded people in Facebook groups and communities. Here are a few to get you started:
Twitter is a tricky one. You really need to stay active on Twitter, if you cannot afford a scheduling app (such as Hootsuite), just yet. Twitter demands the most promotional time of all the platforms, and is super active.
Instagram, like Twitter, also demands a lot of attention. The difference between the two platforms is strategy. Strategically posting during the correct times and avoiding over-posting can become your blog’s recipe for success!
Pinterest can become a goldmine of blog traffic, as long as you use it properly. Avoid spammy behaviour, and have a Pinning strategy in place. Make sure you include valuable keywords (SEO) in your Pin descriptions so that they can be found. Become part of Pinterest Groups and share others’ Pins as well.
Just starting out? We have two newly created group boards which you can join that are wedding related:
#Wedding Group Board – for all wedding related Pins
(We’ve made it easier for you to build your blog from the first step to the last, with our Blog Planner Kit. Plan, manage and maintain your blog with all of our printable sheets and planners + all our freebies in one place. Click here to get our Blog Planner Kit now. The Black Edition can be found here.)
Step Seven: Plan, Create and Promote!
From here on forward, you are on your own…
But we have a few things to add to this final, and most important step: PLAN ahead, CREATE as much content as possible and PROMOTE your blog strategically, effectively and through the right channels.
To plan ahead for your blog, we recommend that you create an editorial calendar for your blog. On this calendar, you can map out when you want to create and publish, share and promote your stuff. Use it along with the social media calendar we discussed earlier on.
Remember to keep on creating and to set clear blogging goals for yourself!
Also Read:
- The ultimate valuable resources list for wedding planners
- The pros and cons of being a wedding planner
- 11 Things you can do to gain wedding planning experience
**Last bit of encouragement before we close off…**
Starting a blog is easy. Maintaining the same blog and turning it into a new, successful venture is, however, a different story. We understand that most bloggers want to pour their hearts into their blog, but not many have the patience to follow through.
There are so many posts out their that talk about how one blogger made “x amount of money” or gained “x amount of followers and traffic” in only a few short months.
In fact, the newest trend among some bloggers is that they post their monthly income reports, and claim: “This is not to brag. This is to encourage others and to show everyone that anything is possible…” – not realizing that to some, their income reports can be discouraging instead, or even depressing. Because we are all wondering when it is our turn to shine.
Taking your wedding blog from it’s diaper phase into it’s toddler phase is truly hard work. And then molding and growing that toddler into something truly remarkable is even more hard work, dedication and lots of motivation (and coffee!). But don’t let all the hard work put you off – it is really all worth it in the end!
So make sure to plan ahead. Visualize where you want to take your wedding blog. How you can improve and review at every step of the way. How can you make your blog stand out over all of the other blogs out there?
Lastly, never become discouraged! Like we mentioned in this post already: Every single blog is different. So, what works for one blog, might not work for another! Each strategy you discover that works, is through trial and error, only. If you’re not getting the results or feedback you want, try something different.

(We’ve made it easier for you to build your blog from the first step to the last, with our Blog Planner Kit. Plan, manage and maintain your blog with all of our printable sheets and planners + all our freebies in one place. Click here to get our Blog Planner Kit now. The Black Edition can be found here.)